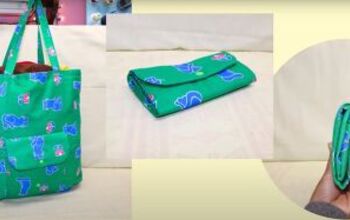
Check Out This Super Cute DIY Tote Bag Idea

Here’s another of my DIY tote bag ideas. This one is more of a bucket shape with shorter handles. It has an inside pocket and a snap fastening and is easy to put together with my step-by-step instructions.
Tools and materials:
- 12oz canvas fabric
- Cotton lining fabric
- 1 pair plastic snap fasteners
- Snap pliers
- Paper for pattern
- Pencil
- Ruler
- Sticky tape
- Fabric clips
- Scissors
- Safety pin
- Iron
- Seam ripper
- Sewing machine

1. DIY tote bag pattern
You’ll need a piece of paper 18 1/8” by 13 3/8” (46 cm by 34 cm) for the pattern. I use the plain side of a sheet of wrapping paper.
Fold the sheet in half lengthways so the plain side is on the outside.
Draw a line across the paper, 2 inches (5 cm) up from the folded edge.

Mark 4 3/4” (12 cm) from the left side along the top open edge. Join the mark to the left end of the first line.
Draw a curve from the top section of the diagonal line into the top edge.

Measure 7 7/8” (20 cm) from the right side along the top edge and make a second mark 5/8” (1.5 cm) down the right side from the corner.
Join these two marks.

Draw a rectangle at the lower right corner, 4 3/4” (12 cm) high by 2 3/4” (7 cm) wide.

Draw a curved line between the start and finish of the rectangle.
Cut out the paper pattern.

2. Cut out the fabric
Open out the pattern and cut two outer fabric and two lining pieces from it, for the bag back and front.

To make the pattern for the side sections, refold the pattern along the centerline.
Draw a diagonal line joining the left side of the first line to the bottom of the cut-out on the right.

Fold the pattern along this line and tape down the edge.

Turn the pattern over and cut off the excess.

Open out the pattern and cut 2 pieces from each of the canvas and lining.
You will also need a 12 1/2” (32 cm) square of lining fabric for the inside pocket and two strips of canvas 15 3/4” by 3 1/2” (40 cm by 9cm) for the handles.

3. Assemble the outer bag
Place one large and one small canvas bag piece together with the right sides facing.
Line up the right side edges and sew them in place.
Repeat for the other two canvas bag pieces.

Clip the two sewn sections together with the right sides facing.
Sew the side and lower edges with a 3/8” (1 cm) seam allowance.

4. Bag handles
Fold the strips for the handles in half lengthways with the right sides inside and sew the long edges.
Use a safety pin to turn them right side out.

Press flat, with the seam in the center of one side.
Top stitch both long edges.

Clip the handles to the straight sections of the top edge of the bag with the right sides facing, and sew in place.

5. Inside pocket and lining
Fold the square of lining in half with the right side inside.
Sew the open edges, leaving an opening in the long side.

Clip the corners and turn the pocket right side out through the opening. Top stitch the folded edge.
Place the pocket centrally on the right side of one of the larger lining pieces, with the opening at the bottom.
Stitch around the three sides and up the center.
Assemble the four lining pieces in the same way as you did for the outer bag.

6. Attach the lining
Turn the bag right side out and keep the lining wrong side out.
Place the bag inside the lining so the right sides are touching.
Line up the seams and clip them together.
Sew the bag and lining together around the top edge, taking a 3/8” (1 cm) seam allowance.

Snip into the seam allowance around the curves.

Use a seam ripper to open a small section of one of the lining seams.

Pull the bag right side out through the opening.

Sew the opening closed and tuck the lining inside the bag.

Stitch around the top edge of the bag on the right side.

7. Closure
Attach plastic snap fasteners just below the top stitching on the back and front sections of the bag.


Cute DIY tote bag idea
This DIY canvas tote bag has a wide top opening and a flat base, so it’s easy and comfortable to use.
If you don’t have canvas fabric, a recycled pair of denim jeans would look great for the outer bag.
I’d love to know what you think of my DIY tote bag designs and I’d really appreciate it if you’d drop me a comment below.
Next, learn How to Sew a Hobo Bag That Will Look Great With Every Outfit.
The author may collect a small share of sales from the links on this page.


Comments
Join the conversation