Super Cute Strawberry Nail Art Tutorial

In this tutorial, I have some gorgeous strawberry nails to share with you.
If you're looking for something super cute and girly, you’ll love this.
We’ll be using strawberry colors and adding some strawberry designs too. Let’s get started!
Tools and materials:
- Gel polish
- Dotting tool
- Palette
- Fine nail brush
- UV light
- Rhinestone glue
- Strawberry charms
- Gel top coat
- Nail file

1. Apply base layer
Start by applying a base layer of gel polish in a light plum shade. Paint it over all of your nails except your pinky finger.

2. Paint nail red
Paint red gel polish on your pinky finger.

3. Paint second coat
Once the nails have dried, go in with a second coat.

4. Paint pink curves
Apply light pink gel polish in a curved shape at the bottom of the nail like so.
Proceed to do this design on the middle finger and the ring finger as well.

5. Paint red curve
On the index finger, create the curved design with the red gel polish.

6. Outline red curve
Outline the red curve with the pink gel polish.

7. Outline pink curve
Proceed to outline the pink curve on the index finger with the red gel polish.

8. Add red dots
Put some of the red polish on a palette. Then, take a dotting tool, put it into the red polish, and dot it on the edges of one of your pink nails.
Don’t go right to the edge of the nail because when you file your nails, this will mess up the design.

9. Paint strawberries
On another pink nail, paint little strawberry shapes using a fine nail brush. They’ll look like little stretched-out blobs.

10. Paint hearts
Place some pink polish on the palette, then dip your dotting tool into the pink and create little pink hearts all over your red nail.
In between the hearts, add some dots.

11. Add detail to strawberries
Put green gel polish on the palette, pick it up with the dotting tool, and add little stems to the strawberries.
They might look a bit like chilies, but add white dots to the strawberries, which will make them look more strawberry-like.
Then, add some dots in between the strawberries. Again, don’t take the dots too close to the edge of the nail.
Once done, cure your nails under a UV light.

12. Apple rhinestone glue
Apply some rhinestone glue to your index nail and your ring finger nail because we’re going to be adding charms.
Add a good amount of glue so the charms don’t shift or fall off.

13. Add charms
Place charms on the two nails - I’m using a strawberry charm and an iridescent bow charm.

14. Apply top coat
Coat your nails with a gel top coat.
Then, file the edges of your nails, repeat the whole process for your other hand, and you’re done!

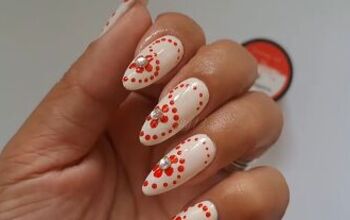
Strawberry nail art DIY
Here are the finished nails! I love how they all share the same color palette, so it looks like a cohesive set, yet each nail is completely unique and has its own design.
These nails are so cute - if you’re looking to channel your inner girly girl, definitely give this design a go.
Next, check out my Easy Pink Barbie-inspired Nails Tutorial.
The author may collect a small share of sales from the links on this page.


Comments
Join the conversation