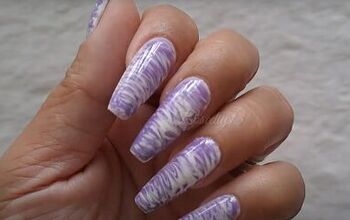
You Have to Try This Glam Sparkle Nail Design

For today’s sparkle nail designs tutorial, I’m going to show you how I used a 2-in-1 dip powder and acrylic to achieve my gorgeous white glitter nails.
I love this nail art design sparkle combined with a neutral base. It’s glamorous yet still classy.
Tools and materials:
- 2-in-1 dip powder
- Acrylic nail monomer
- Brush
- Sparkle gel
- Chunky glitter
- Electric file and buffer
- Topcoat
- UV light

1. Set up
Make sure you’re working in a well-ventilated space! Pour some acrylic nail monomer fast-drying into a small cup.

2. Monomer and dip
Dip your brush in the nail monomer to wet it, and then dip the brush in the dip powder. I suggest using white dip powder if you’re aiming to get the same sparkle nail art as me.

Carefully brush directly onto the upper center of the nail. Press the brush gently to spread the color down and to the sides. Brush along the tip of the nail to cap it neatly.

You can use your brush to lightly wipe away any polish that might have gotten on your skin or cuticles.

You can make one accent nail with a different base color to add some color. I chose a light pink.

3. Dry and test tap
When you’re done with the base color, let your nails dry for a few minutes.
Tap on them to see if they're dry. When dry tapping will make a slight clicking sound.

4. Buff, file, and shape
Use an electric buffer and file to shape and smooth the nails. Then wipe the nails down with alcohol.

5. Add some sparkles
We’re going to use some gel polish to create the designs.
Start with a small amount of sparkly gel at the base of the nail, brushing it lightly upwards, about a quarter of the way up the nail.
Repeat this on each nail.

To add a bit more pizazz let’s add some chunkier sparkles.
You can use a small brush dipped in clear gel to pick up and paint on the glitter and press down the larger bits.
Put them over the sparkle layer and above, going about half way up the nail.

6. Finishing touches
Dry the new layer under the UV light.

Then apply a topcoat and cure for sixty seconds.

Sparkle nail design
I hope you enjoyed this sparkle nail art made with a 2-in-1 dip powder and acrylic base. Let me know what you think. Let’s exchange dip powder nail ideas in the comments.
Next, learn How to DIY the Trending Pink Aura Nails.
The author may collect a small share of sales from the links on this page.


Comments
Join the conversation