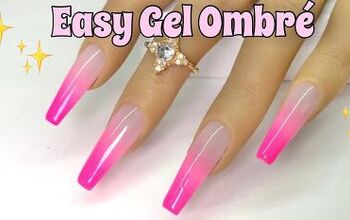
Learn How to DIY These Cute Reflective Nails at Home

Here’s a step-by-step guide to creating a stunning reflective nail design. Reflective nail designs use glitter or metallic polish to achieve a shimmering, mirror-like effect.
This style creates a striking, luminous quality on your nails by reflecting light, making them catch the eye with their sophisticated, sparkling finish.
Follow these steps to achieve a beautiful glitter nails look!
Tools and materials:
- Glitter reflective gels
- Fine nail brush
- UV light
- Liner paint gels
- Top coat

1. Apply silver glitter gel
Start by applying a silver glitter reflective gel to your nails. You can cover the entire nail with this gel or apply it to just part of the nail for a varied look.

2. Add darker glitter
On the nails where you only applied silver glitter gel partially, fill in the remaining space with a darker glitter polish, such as black.

3. Create designs
For a unique touch, create diagonal stripes in contrasting colors on your nails.

4. Refine the design
Use a fine nail brush for precise detailing.

5. Blend for an ombre effect
You can also create an ombre effect by using a brush to blend the silver and darker glitter polishes together.

6. Cure under UV light
Cure your nails under a UV light for 60 seconds to set the gel.

7. Apply liner paint gel
Next, apply liner paint gel along the sides of your diagonal stripes or any other areas you want to accentuate. Then, cure your nails under the UV light for another 60 seconds.

8. Finish with top coat
Finally, apply a top coat to seal your design and cure your nails once more under the UV light.

Here is how the design looks with natural light.

Cute reflective nails
Here is how the reflective nails look under the light: they shimmer with a dazzling, mirror-like brilliance that enhances their depth and sparkle.
I love how this reflective nail design turned out—the silver and black reflective gels, combined with the white and black liner gels, create a striking contrast.
The overall effect is both elegant and playful. I hope this tutorial inspires you to try reflective gels if you haven't already. Share your thoughts on these nails in the comments down below.
For more nail inspiration, check out Quick and Easy MARBLE Nail Art at Home.
The author may collect a small share of sales from the links on this page.


Comments
Join the conversation