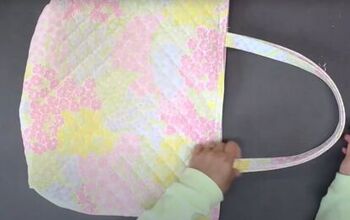
How to DIY an Adorable Quilted Tote Bag

I wanted to experiment with a different type of patchwork for this DIY tote bag. It looks like a quilted tote bag, and you could certainly add a layer of batting if you want, but I like the effect without it.
The bag has an inside pocket and snap button fastening and is quite large with a long handle drop.
Upstyle Recommends!
Tools and materials:
- Plain cotton fabric in toning shades
- Patterned cotton fabric
- Lining fabric
- Snap button and pliers
- Cutting mat
- Rotary cutter
- Ruler
- Pins
- Scissors
- Iron
- Sewing machine

1. Patchwork panel
Cut two 10 inch (25 cm) squares from the plain fabric and two from the patterned fabric.
Place them in a square with the plain pieces diagonally opposite each other.

Join each piece to the one next to it with the right sides facing and press the seams flat.

Sew the two rows together, matching the seams carefully, and press again.

Lay the panel right side up on a cutting mat.
Place the edge of a ruler 2 inches (5 cm) to the right of the central seam and cut through the panel with a rotary cutter. Do not separate the pieces.

Turn the mat through 180 degrees and make a cut 2 inches (5 cm) to the right of the same seam.

Turn the mat through 90 degrees and repeat the cuts either side of the other seam.
Separate the pieces.

Rearrange them so that the plain and pattern sections alternate in each direction.

Join the three pieces together in each row and then sew the rows together horizontally. Make sure you match the seams carefully as you do this and press the pieces well.
Repeat to make a second identical panel.

2. Bag handle
Cut a strip from the second plain fabric, 28 inches (70 cm) long by 4 inches (10 cm) wide.
Fold it in half lengthways and press.

Open the strip out and press both long edges towards the center crease.

Fold the handle in half again lengthways and press.
Top stitch the two long edges.
Make a second handle to match.

3. Attach the handle
Place the patchwork panel with the right side uppermost.
Pin the ends of the handle to the top edge of the panel, 3 inches (8 cm) either side of the central seam and with the ends extending 1 inch (2.5 cm) above the panel.

Sew the handle in place.
Attach the second handle to the other panel in the same way.

4. Side and base panels
Cut three pieces from the same fabric as the handle, each 17.5 inches (44 cm) long by 4.5 inches (11.5 cm) wide.

Pin and sew them to the side and lower edges of one of the patchwork panels, with the right sides together.

Place the second patchwork panel on top, with the wrong side uppermost.
Pin and sew it to the raw edges of the side and base pieces.
Turn the bag right side out.

5. Inside pocket
Cut one piece of plain and one piece of lining fabric, each 17.5 inches (44 cm) by 8 inches (20 cm).
Place one over the other with the right sides facing and sew the long edges.

Turn the tube of fabric right side out and press.
Top stitch one long edge.

Cut two pieces of lining fabric 17.5 inches (44 cm) square.

Pin the pocket centrally to the right side of one of the lining pieces.
Top stitch it in place along the side and lower edges and up the center.

6. Lining
Cut three side and base panels from the lining the same size as for the main panel.

Attach them to the lining piece with the pocket.

Put the other lining panel on top and complete it as you did for the outer panel.

7. Attach the lining
Insert the main bag inside the lining so the right sides are together.
Matching all the seams carefully, pin the top edges together.

Sew, leaving an opening between the handles on one side.

Pull the lining through the opening, so the bag and lining are right side out.

Tuck the lining back inside the bag and press the top seam.
Sew two rows of topstitching around the upper edge.

Attach snap buttons centrally to the top edges below the top stitching.

Cute DIY quilted tote bag
I really enjoy coming up with different DIY tote bag ideas and this one looks far more complicated to make than it is.
You could experiment with other ways to cut the original patchwork squares to vary the pattern and I’d love to see your results if you do.
Please leave me any questions or comments below - it’s always great to hear from you!
The author may collect a small share of sales from the links on this page.


Comments
Join the conversation