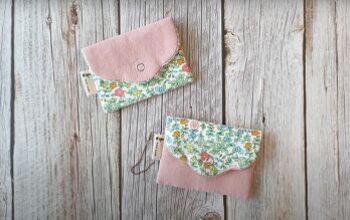
How to DIY a Cute and Easy Card Wallet

This mini DIY card wallet is so practical! Not only does it hold your cards in the central section, it also has two buttoned compartments for bank notes and cash.
I’m going to show you how to sew a wallet out of fabric so that you can tuck it away in a pocket or small bag.
Tools and materials:
- Outer canvas fabric
- Cotton or canvas lining fabric
- 2 plastic or metal snap buttons
- Snap button press
- 11 7/8 inch (30 cm) circle template or plate
- Fabric marker
- Ruler
- Scissors
- Iron
- Sewing machine

1. Make the basic DIY fabric wallet shape
Cut a 13 inch (33 cm) square out of the outer and lining fabrics.
On the wrong side of the outer fabric, draw a 11 7/8 inch (30 cm) circle in the center of the square. I’d advise using a template such as a plate or bowl to make this easier.

Place the outer and lining squares together with the right sides facing and the outer square on top.
Sew them together, following the outline of the circle as your stitching line and leaving a small opening at one side.

Trim off the excess fabric approximately a quarter inch (0.5 cm) from the stitching.

When you reach the unstitched section, allow a larger seam allowance so you can turn under the edges.

Press the edges of the opening to the wrong side.

Turn the circles right side out through the opening and press the seam carefully.
Top stitch close to the edge, making sure the seam allowances are tucked inside so you are sewing the opening closed at the same time.

2. Create the wallet compartments
Fold the circle in half with the lining on the inside.

Measure 4 1/2 inches (11.5 cm) across the semicircle from the fold and draw a vertical line parallel to the fold.
Sew the two halves of the circle together along the line.

Refold the wallet so the seam is in the center and open the sides of the seam flat.

Press well so all the edges are crisp and sharp.

Fold the wallet widthways with the outer fabric on the inside and press again.

Draw a mark at either side of the folded wallet, at the level of the top of the seam.

Sew both the side edges together, from the fold to the marks.

3. Attach the snap buttons
Fold down the flaps above the stitching on the front and back of the wallet.

Push the prong of the cap of a snap button through the edge of the flap from the outside. Make sure it’s in line with the central seam.

Place the button socket over the prong and grip it in place with a button press.

Mark the point on the seam for the lower half of the button.

Push the open prong ring through from the inside of the wallet at the mark and press the stud on to it from the outside.
Attach a button to the other side of the wallet in the same way.


DIY card wallet
These DIY card wallets make great gifts and are also a popular item to sew for sale. With a little practice, you can make them in five to ten minutes, so they can be very profitable.
I also find them fun to make in different colorways.
You can experiment with various materials as well. Canvas is a great standby but you can use more lightweight fabrics if you back the squares with fusible interfacing before cutting and sewing them.
I hope you enjoyed my DIY wallet pattern and I’d love to know what you thought of it in the comments below.
Next, check out my Easy Tutorial on How to Sew a Pouch With a Zipper.
The author may collect a small share of sales from the links on this page.


Comments
Join the conversation