Pretty Vintage Pin Curls Tutorial for Long Hair

I love vintage hairstyles and when I had my hair first cut short, I tried putting it into curls using soft rollers.
It was something of a disaster and looked like I was wearing a curly helmet!
Now my hair has grown below shoulder length, I wanted to try making vintage pin curls in long hair.
Was it successful? Let’s find out!
Tools and materials:
- Pin curl prong clips
- Setting lotion
- Small spray bottle
- Medium-toothed tail comb
- Scarf
- Hair dryer with diffuser (optional)
- Hairspray (optional)

1. Getting my supplies together
I used setting lotion diluted half and half with water in a small spray bottle.
For holding the curls I got some pin curl prong clips, because I didn’t think bobby pins would hold my thick hair firmly enough.
These wouldn’t be very comfortable to sleep on but as I was doing this during the day and on dry hair, it wasn’t a problem.

2. Section the hair
I usually wear my hair with a center part, but for this style I decided on a side parting for the vintage hairstyle I envisaged.

Starting at the front hairline, I sectioned off about 2 inches of hair at the parting.
I sprayed it with the diluted setting lotion from the roots to the tips and combed it through.

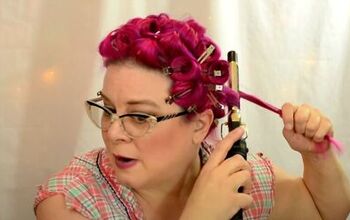
3. Curl it up
It took me a while to remember how to make the pin curls. I curled the ends around my fingers and then rolled the curl up towards my hair.
I didn’t want my curls to be too small so I wrapped them around two fingers.

When I’d curled the hair as far as I wanted, I turned it so it was flat against my head and secured it with the clip.
I made a second pin curl below the first.
I was aiming to make the curls a consistent size and to curl them all in the same direction.

4. Side sections
As I worked towards the back of my head, I didn’t want the curls to be too close to the top of my head.
When I started the second row on that side, I didn’t bring the curl right up to the parting.

I made two curls in each row on that side, then started on the thicker side of the parting.
I made the curls around my face first, then worked towards the back of my head.

5. Back section
I curled the back in horizontal rows across my head.
I discovered it’s very important to make sure the ends of the hair are curled quite tightly, as you’ll see when I remove the clips later.
I made about eight curls across the back of my head in two rows.
Altogether I only spent about 15 minutes putting in the pin curls.

6. Dry the hair
I wrapped my hair in a scarf and left it to dry naturally for a couple of hours.
Then I used my hairdryer with a diffuser pressed against my hair to make sure all the curls were dry on the inside as well.

7. The comb-out
I removed a clip at the back to check that my hair was completely dry, then released the other curls.
I finger-combed my hair to relax the curls a little.

Then I combed through them in sections with a medium-toothed comb.
This can be a little tricky as you don’t want to comb the curl out completely, but you do want them to blend in with each other.
I was pretty pleased with the way they looked after the first comb through, at least from the front.

When I finally saw the back, I realized that the curls weren’t as successful as at the front.
Some of the ends were straight where I hadn’t curled them tightly enough.

8. Dressing out
Then it was a case of arranging my hair into a style I liked. I added some bobby pins at the front to make a wave.

Vintage pin curls on long hair
Overall, I was much happier with this attempt than my earlier ones.
I learned that the back curls need to be tighter and perhaps have less hair in each.
I definitely prefer having a straight section at the roots and only starting the curls part way down.
Do you like these vintage styles? Let me know if you have any tips for me.
Super Easy Hair Growth Hack Recipes
The author may collect a small share of sales from the links on this page.


Comments
Join the conversation