Easy 3-Tiered Maxi Skirt Pattern Tutorial

Today, I’m going to take you step by step through making a three-tiered skirt with an elasticated waist and side pockets. You can use my pattern or simply follow my instructions to measure and cut the three tiers.
So let’s get started!
Tools and materials:
- Tiered maxi skirt pattern
- Paper for pattern
- Masking tape
- 45 inch (114 cm) wide viscose or cotton mix fabric
- 1.4 inch (3.5 cm) wide elastic
- Fabric marker
- Ruler
- Pins
- Scissors
- Safety pin
- Iron
- Sewing machine
- Serger (optional)

1. Cut out the fabric
Print out the pattern, tape the sheets together and cut out your size.
Cut out the fabric pieces and transfer all the pattern markings to the fabric.
If you’re not using my pattern, cut two panels for the top tier. Each will be half your hip measurement plus 1.6 inches (4 cm) multiplied by 1.5 wide by 9.5 inches (24 cm) deep. You can adjust the length if you want.

The second tier will be the width of the first tier multiplied by 1.5 wide and the same depth. Cut two of these.

Base the third tier on the width of the second tier multiplied by 1.5 and cut two.
Cut four pocket pieces, using my pattern or your own.

2. Insert the pockets
Measure 4 inches (10 cm) down from the top of the first tier on each side of the front.

Pin and sew the straight edge of the pocket to the sides, with the right sides facing.
Repeat for the back panel.

3. Join the tiers
Using your serger or an overlock stitch on your sewing machine, finish the bottom edge of the first tier, the top and bottom edges of the second tier and the top edge of the third tier.

Sew one or two rows of gathering stitches along the top edges of the second and third panels. Leave the ends long.
Gather the top of the second panel to match the lower edge of the first panel on the front of the skirt.
Pin the sides and center of the edges together with the right sides facing.
Distribute the gathers evenly across the panel and pin and sew in place.

Repeat to attach the lower tier to the middle one.
Sew the three tiers today in the same way on the back.

Press the seams up towards the top of the skirt.

4. Sew the side seams
Place the front and back of the skirt together with the right sides facing.
Line up the horizontal seams.
Pin and sew the side seams together.
Stitch down to the top of the pocket opening on each side, sew around the curved edges of the pocket bags and continue down the seam to the hemline.

5. Make the waistband
Finish the top edge of the skirt on your serger or sewing machine.
Turn the top edge to the wrong side by 1.6 inches (4 cm) and pin in place.

Cut your elastic to fit your waist comfortably, with an overlap.
Check that it is narrower than the turned-down waist edge.

Sew the waist edge down, stitching close to the lower edge and leaving a 1.6 inch (4 cm) opening for the elastic.
Use a safety pin to thread the elastic through the waistband, keeping the elastic flat.
Overlap the ends of the elastic and sew them together securely.
Sew the opening closed.

Sew a vertical line of stitching through the waistband at each side seam, to stop the elastic from twisting.

6. Sew the hem
Turn up a narrow double hem around the lower edge of the skirt.
Pin and sew in place.


Tiered maxi skirt pattern
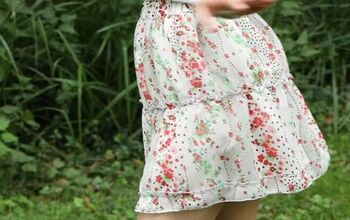
I love the boho look of this very simple red tiered maxi skirt.
I used a viscose fabric, but cotton or any light to medium weight fabric would work just as well.
If you’re brand new to sewing, you can leave out the pockets and just sew straight down the side seams if you want. This is so beginner-friendly though, I encourage you to make the full pattern.
If you prefer a fuller skirt, make each tier double or 2.5 times the width of the previous one.
I’d love to know what you think of this pattern. Please drop me a comment below.
Next, learn How to Sew a Cool Stevie Nicks-inspired Cropped Denim Top.
The author may collect a small share of sales from the links on this page.


Comments
Join the conversation