How to DIY Glam Red and Gold Nails: Easy 3D Nail Gel Art Tutorial

Follow along with this step-by-step tutorial to create your own red and gold nails. You can customize them to suit your style and they will upgrade any look!
Tools and materials:
- Fingerless protective gloves
- Nail curing lamp
- Cleanser wipes
- Base gel
- Sparkly red gel polish
- Jelly nonstick hand extension nail gel
- Manicure detail tool
- Mirror nail powder
- Rhinestones
- Super top coat
1. Prep your nails
Start by removing any polish, cleaning cuticles, trimming nails and wiping them with cleansing wipes.

2. Apply a base coat and cure
Apply a clear base coat to your nails.

Then flash cure your nails.

3. Apply 2 coats of gel polish and cure
Now, apply 2 coats of glittery red gel polish.

Then cure your nails.

4. Decorate with jelly non-stick extension gel
Pick up gold mirror gel powder with some jelly non-stick extension gel on a manicure tool.

Roll and shape the gel with your fingers.

Use tweezers to apply it to the nails.

You can get creative with arch shapes and balls.

Turn the balls into petals with your nail tool.

Add as much detail and texture as you’d like.

5. Apply rhinestones
If you’d like, take your red and gold nail art to the next level by adding rhinestones.

6. Cure
Set all the decorations into this 3D nail gel art by curing them for 60 seconds.

7. Apply top coat and cure
Apply super top coat and cure for an additional 60 seconds.

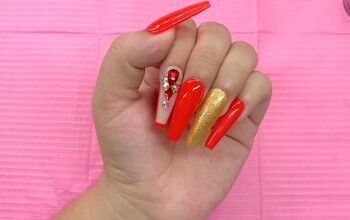
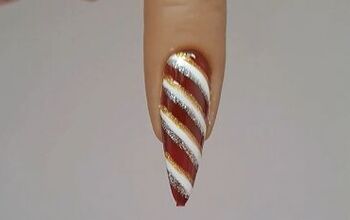
Here’s the final look of this festive nail art in red and gold:

Red and gold nails
Let me know in the comments if you liked these red and gold nails.
Next up, create gorgeous nails at home with the help of this in-depth polygel nail tutorial.
The author may collect a small share of sales from the links on this page.


Comments
Join the conversation