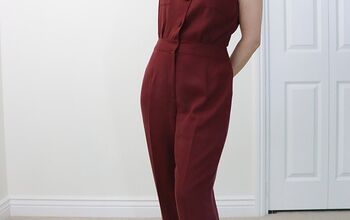
Easy Sewing Pattern Tutorial: DIY Comfy Jumpsuit

You can get my jumpsuit sewing pattern in eight sizes for free. You can make it in almost any non-stretch fabric, from lightweight cotton to denim or canvas.
If you use cotton, remember to pre-wash the fabric to prevent it from shrinking after sewing.
This is a perfect project for beginners and includes inserting side pockets.
Tools and materials:
- Free jumpsuit sewing pattern
- Paper for pattern
- Non-stretch fabric
- Bias tape (optional)
- Measuring tape
- Fabric marker
- Pins
- Scissors
- Sewing machine

1. Cut out the pattern pieces
Print out the pattern, join the sheets together and cut out your size.
From your fabric, cut two front pieces, two back pieces and four pockets.
Transfer all the pattern markings to the fabric.

2. Attach the pockets
Measure 16 inches (41 cm) from the top of the front and 18 inches (46 cm) from the top of the back.
Place a mark at each side seam.

Pin the shorter straight edge of each pocket to the side seams below the marks with the right sides facing, and sew in place.

3. Join the side seams
With the right sides together, pin the fronts to the backs at the side seams.

Sew from the underarm to the top of the pocket, sew around the edges of the pocket bags and continue down the rest of the side seam.
Finish the seam allowances on your serger or with a zigzag or overlock stitch on your sewing machine.

4. Center seams
Pin and sew the two sections together at the center front and back crotch seams, with the right sides facing.
Refold the jumpsuit so the crotch seams are in the center.

Align and pin the bottom of the crotch seams together.

Pin and sew outwards from the crotch down the inner leg seams.

5. Armhole and top edgings
Turn in a narrow double hem along each armhole edge, and pin and sew in place.

Sew a half inch (1 cm) double hem at the top of the front and back panels.
Optionally, use bias tape instead. Attach the tape with the right sides together, turn to the inside and stitch down.

6. Make and attach the straps
Cut two strips of fabric 27.5 inches (70 cm) long and 2.5 inches (6 cm) wide for the back straps.
Cut two more strips 3 inches (8 cm) long and 1.5 inches (4 cm) wide for the front loops.

Fold the strips in half lengthwise with the right sides inside.
Sew the long edge and one short edge.

Turn the strips right side out and press.

Top stitch both long edges of the shorter strips.

Turn in the open edge of the back strap and pin it to the top inside edge of the back bib.
Sew securely in place.

Turn in the ends of the front loops and fold the loops in half.

Attach them securely to the inside of the front bib.

7. Finishing
Sew a narrow double hem at the bottom of each leg.
Make the optional tie belt by cutting a strip of fabric 4 inches (10 cm) wide and long enough to wrap and tie around your waist.
Fold and stitch it in the same way as you did for the back straps.

DIY jumpsuit
This pattern can be made up as a full length loose overall jumpsuit, cropped overalls or as a short romper suit.
Depending on the fabric you use, you can customize it for any season. It’s warm and comfy in a sweatshirt or fleece fabric for winter lounging and looks just as good made up in a luxury fabric for evening wear.
I’d love to know which version you make. Please leave me a comment or any questions below.
Next, learn How to DIY a Cute Boho Top for Spring and Summer.
The author may collect a small share of sales from the links on this page.


Comments
Join the conversation