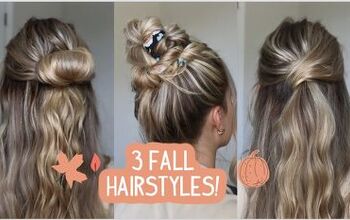
6 Cute and Easy Hat Hairstyles for Fall

If you find it challenging to look cute in a baseball cap, this tutorial is for you! I’m about to show you 6 easy fall hat hairstyles that will work nicely with medium to long hair.
Upstyle Recommends!
Want to save?
Get your 30-day free trial of Amazon Prime today before Prime big deal days on October 8-9th!
Tools and materials:
- Baseball hat
- Hair elastics
- Claw clip
- Bobby pin
- 2 hair ties
Table of contents
Hair down with no wonky hairs
1. Tie the front sections
Leave out bangs. Grab a section of hair on both sides.

Tie them together with a hair elastic.

2. Flip it back and tighten
Flip it back over your head and tighten.

3. Add your hat
Wear your hat. This small adjustment means no more hairs out of place!

It looks polished from the back too.

Upgraded bubble braid
1. Section off an outer piece
Gather all of your hair to 1 side. Section off the hair from the outside.

2. Make a knot and secure it
Pull it under the ponytail.

Bring the end around to meet your thumb.

Pull the ends through the loop, like you’re starting a friendship bracelet.

Incorporate the ends with the rest of the hair.
Using a clear hair elastic, pinch under the knot to hold the hair and secure the elastic directly under the knot. Tighten it.

3. Repeat
Separate a similarly-sized section of hair from the tail and repeat this process, making a 2nd knot.

4. Add volume
Use your fingers to fluff the middle section for volume.

5. Repeat and add your hat
Repeat this process until you run out of hair.

My hair is relatively thin and not super long, so I only needed a total of 4 knots. Here’s the final look of this fall hairstyle with a hat:


Space buns
1. Wear your hat and split your hair
With your hat on, split your hair into 2 equal sections.

2. Make a messy space bun
Place a hair elastic down a couple of inches, over 1 section:

Stick your fingers through the opening:

Flip your ends up.

Bring your hair tie around the bunch and give it a pull to either side.

See this in slow motion in t he video from 5:08 -5:26.
3. Wrap the ends
Wrap the ends around the base of the bun, tucking them into the elastic.

4. Repeat to create a 2nd space bun
Remember, space buns are sisters, not identical!

Pull out some face-framing hair. Here’s the final result of this space buns hairstyle for hats.


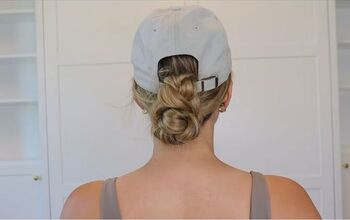
Hat hairstyle with a claw clip
1. Make a low ponytail with a bubble bun underneath
Wear your hat. Collect all of your hair at the back, pulling it through a clear hair elastic.

Pull the tail up and make a bubble bun underneath the ponytail.

2. Pull the ends through the cap
Pull the ends through the opening at the back of your cap.

3. Make another loop and add a claw clip
Press down the ends to make another loop.

Hold this loop in place with a claw clip.

4. Tuck in the ends
Split the ends into 2 sections, twist each and tuck them on either side, inside the claw clip.

Here’s the final hat hairstyle. Don’t forget to pull out some face-framing hairs so you don’t look bald!


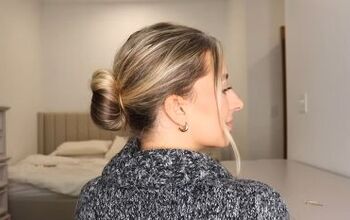
Braided bun hairstyle with a hat
1. Pull your hair to the side and make a braid
Pull all of your hair to the side and make a 3-strand braid. Tie the ends off with a clear, hair elastic.

2. Add your hat and pull the braid through
Wear your hat and pull the braid through the opening in the back.

Pull out a small part of the base of the braid to make a bump below the strap.

3. Push the bun through a section of the braid
Bring the tail back down to meet the bun.

Open up the section of the braid that’s on top of the bun and wrap it around the bun.

Pull the bun to either side to add volume.

4. Hide the ends
Tuck in any ends sticking out into the elastic. Add a bobby pin to secure.

Pull some face-framing hair out and enjoy your cute fall hairstyle.


Pull-through braid hairstyle with a hat
1. Make 2 sections and tie them off
While wearing your hat, split your hair into 2 sections on 1 side. Tie them off by the nape of your neck with hair ties. Make sure they are tight, but don’t use elastics that would rip out your hair.

2. Make a loop in the back ponytail and pull the other through
Make an opening in the back section, above the hair tie.

Pull the front ponytail through the opening.

3. Pull the hair ties down and repeat
Pull both hair ties down about an inch or 2 and repeat the process, making a gap in the back ponytail and pulling the other through it.

4. Repeat until you run out of hair
Repeat this until you run out of hair. During the process, as your hair thins at the ends, the hair ties may loosen, so tighten them as needed.

5. Finishing touches
Remove the hair ties and tie off the braid with an elastic. Pinch and pull to add volume to the sections of the braid.

Here’s the final result for this easy, fall hairstyle with a hat.

Hat hairstyles for fall
Let me know which hat hairstyle you’ll be trying out first in the comments!
Next up, try this cute and easy 60 second hairstyle.
The author may collect a small share of sales from the links on this page.


Comments
Join the conversation