How to DIY a Cute Zipper Pouch

A DIY zipper pouch has so many uses, from carrying your makeup and jewelry when traveling to storage for small stationery items.
Whether you’re a beginner or more advanced, my project on how to sew a pouch with a zipper will have some useful tips and tricks for you.
Follow along and see how easy it is!
Tools and materials:
- 12 oz canvas fabric
- Cotton lining
- 7 inch (18 cm) zipper
- A4 paper
- Ruler
- Pencil
- Fabric clips
- Scissors
- Iron
- Sewing machine

1. Cut out the fabric
Cut two pieces of canvas and two of lining, each 10 5/8” by 7 1/2” (27 cm by 19 cm).
Additionally, you will need one piece of lining 9 1/2” by 2” (24 cm by 5 cm) for the wrist strap and four small pieces of lining 1 1/2” by 1 1/8” (4 cm by 3 cm) to attach to the zipper.

2. Bag pattern
Fold a sheet of A4 paper in half widthways.
Draw a vertical line 5 1/4” (13.5 cm) from the folded edge.


Draw a horizontal line from the folded edge to the vertical line, 7 1/2” (19 cm) from the top edge.
Mark a 1 1/8” (3 cm) square in the corner where the two lines meet.

Measure 1 1/8” (3 cm) in from the vertical line on the top edge.
Join the mark to the outer edge of the square with a slightly curved line.
Cut out the bag shape and open out the pattern.

Use it as a template to cut the four large pieces of canvas and lining to size.

3. Prepare the zipper
Draw a line just above the top of the zipper teeth. Measure 6 3/4” (17 cm) and draw a second line across the bottom of the tape.

Sandwich the ends of the tape between the four small pieces of lining, lining the outer edges up with the lines on the tape.
Sew 3/8” (1 cm) inside the outer edges.

Trim off the excess tape.

Fold the lining pieces outwards and top stitch.

4. Wrist strap
Fold the strip of lining lengthways with the wrong side inside and press.

Open out the strap and fold the long edges into the center and press.

Fold the strip in half again lengthways and top stitch both the long edges.

Fold the wrist strap in half widthways.
Stitch it to the side edge of one of the bag pieces, 1 1/8” (3 cm) from the top edge, on the right side.

5. Insert the zipper
Place the zipper right side up on the right side of one of the lining pieces, aligning the tape with the top edge of the lining.

Place a canvas piece on top, with the wrong side uppermost.
Sew in place along the top edge.

Refold the fabric so the right side of the canvas is uppermost and top stitch close to the edge.

Place the zipper section on top of the right side of the remaining piece of lining.

Cover it with the last piece of canvas, with the wrong side uppermost and sew the seam.

Open out the pieces with the right sides facing you and top stitch close to the edge.

6. Assemble the bag
Refold the bag so the right sides of the canvas and the right sides of the lining are together.
Line up the center seam and the side edges.

Stitch the side and bottom edges between the cut-outs, leaving a small opening in the lower edge of the lining.

Bring the diagonal edges of each cut-out together with the seams in the center and sew across them.

Pull the bag through the opening in the lining and sew the opening closed.
Tuck the lining inside the bag.

7. Shape the top
Close the zipper.
Pinch one end of the zipper and bag into a triangle.
Sew a straight line across the canvas sections, to line up with the top stitching on the ends of the zipper.

Repeat at the other end.

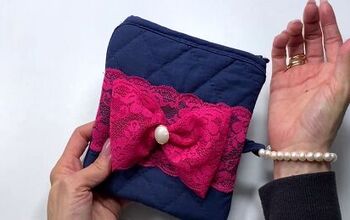
DIY zipper pouch
I’ve sized this DIY pouch up quite small, just 7” by 5 1/2” (18 cm by 14 cm) but with some experience, it’s quite simple to size up.
You could add an inside pocket by attaching it to the lining before inserting the zipper.
I’d love to know how you get on with this zipper pouch in the comments below.
Next, check out my Cute and Easy DIY Backpack Tutorial.
The author may collect a small share of sales from the links on this page.


Comments
Join the conversation