How to Create Stunning Chunky Glitter Nails

Have you tried creating chunky glitter nails?
In this tutorial, I’ll show you how to do glitter ombre nails over a solid color using dip powders.
The result is absolutely ethereal. Let’s jump right into the tutorial.
Tools and materials:
- Dip base
- Solid dip powder
- Clear dip powder
- Glitter dip powder
- Activator
- Top coat
- Makeup brush
- Nail tools
- Tape

1. Push back your cuticles
Push back your cuticles to expose more of your nail bed.

2. Apply the dip base
Apply a layer of dip base evenly. Because the solid colors tend to show everything, especially when they’re lighter, they’re not as forgiving as shimmers.
Applying your dip liquids thinly from the start will also help the solids look more even.
Since I do my nails often, I prefer to use a peel base, so I don’t have to file off my dip powders every week.

3. Pour dip powder onto the thumb, pointer, and middle finger
Pour the solid dip powder over the still-wet dip base. I’m using a light lavender color.
Tap off the excess powder, and add more powder to ensure you get as much of a layer as possible.

Use any sharp tool to clean the remaining powder out of the crevices of your nails.

4. Brush your nails
Brush over your nails with a brush to get rid of all of the excess powder that didn’t get knocked off manually.

5. Apply another layer of the dip base and powder to the nails except the middle
Apply a second layer of dip base and then dip powder over the nails except for the middle nail.
If you need to build your apex — which is the highest point of your nails — do your first dip as a strip halfway down the middle of your nail and the second about 3/4s of the way down toward your cuticle.
Build the powder from there. I already have a built apex, so I only need to do two dips.

6. Cover only 3/4s of the middle nail with dip powder
Since the glitter ombre is going to be on the middle nail, don’t put the second layer of dip powder down the nail.
Leave some space as the majority of the glitter is going to be at the cuticle, and this will help prevent the nails from looking bulky.

6. Apply a layer of clear dip powder to the thumb and pointer nail
Use clear dip powder as your last dip because it protects your dip powders from buffing, shaping, and filing.
The thumb and pointer finger will be the two solid nails, and since I get messy with glitter, this will also protect the nails from getting messed up.

7. Activate the two solid nails
Finish the two nails with the activator.

8. Apply glitter dip powder to the ring finger and pinky
For the final two nails, repeat the dipping process with a glitter dip powder instead of a solid.
Remember to keep your liquids thin so you’re not walking around with chunky nails.
I use dip cups for the first layer of chunky glitters to avoid picking up chunky pieces.

You can also use a piece of tape to pick up all of the chunky pieces in between each dip.
It also helps to push the glitter down to avoid the chunky look.

You can also use a nail tool to pick up chunky glitter pieces and add them if you like.

9. Apply glitter in an ombre pattern on the middle nail
Finally, for the middle nail, apply that dip base over most of the nail this time.
Use a makeup brush to pick up the glitter and then tap the brush so the glitter falls onto the nail.

The key to doing glitter ombres is to tilt your finger down just slightly to get the best cascading ombre coverage.
Tap the glitter at the cuticle area so most of the glitter is focused there and isn’t too heavy-handed on the rest of the nail.

Use that tool to place the big chunky glitter pieces on the nail.

10. Finish the glitter nails with clear dip powder
Always finish glitters with clear dip powder. Otherwise, when you go to buff and file your nails, your glitters tend to turn silver.
Brush off the excess and activate.
Your nails will be ready to buff, file, and shape when you tap on your nails and it gives you a hard clicking sound.

11. Apply a top coat to every nail
After shaping your nails, apply a final top coat. Make sure to follow the top coating instructions because each liquid is a bit different.

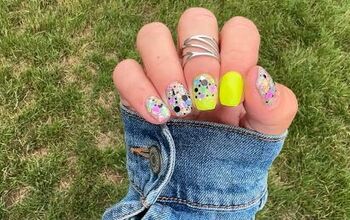
Chunky glitter nails
Here are the finished ombre glitter nails. This nail technique is so cute and it creates the most gorgeous nails without much effort!
Let me know if you’ll try this out in the comments below.
The author may collect a small share of sales from the links on this page.


Comments
Join the conversation